Introduction:
Hello again.
This article will be formatted a lot like the last one in that I will be going through the progressions step-by-step. When I review new concepts in the future, I will not go into as much detail as I think you guys will get my drift. I plan on introducing to you three other concepts (Search, Snag, and the Power-Read) that I think will become really effective in my next article which may come within the next day or the next three days depending on how things shake up on my end of the world.
Today, I will be going over the Stick Draw, the most popular RPO in football. A lot of teams like to run this a lot of different ways. I will be going over the most common way I have seen this RPO run at the collegiate level and the progressions attached to it against both 2 Hi and 1 Hi safety setups. As you will see, there are a multitude of problems when facing a 1 Hi structure. But first, lets get to the basic concept and work our way to it.
Stick Draw:
The Stick combo meshed with a draw option is the most used RPO in the game. According to X and O Labs, a football research organization, they found that the Stick RPO concept is the most run and the most efficient of the RPO series. Their survey announced that 53.9 percent of the coaches averaged between five to seven yards per concept run. The Stick RPO was also the most used out of the RPO’s surveyed and the most installed by coaches in the collegiate and high school level. Considering that the Stick is a powerful quick game concept in its own, it’s not surprising that coaches have toyed with it with a run-option attached to it. If an offensive coordinator is going to have one RPO in his playbook, it is most likely going to be this one.
The Stick Draw is similar to every other RPO in that it goes through the same progression. The QB has to identify the number of the box and the coverage, read the leverage of the defenders, analyze the dive and pitch reads, and throw backdoor to the stretch if all else is covered. You don’t have to change your offensive philosophy by much in order to include this play in. And because most offenses at all levels of football already have this concept installed, you don’t have to spend a lot of practice time repping it. Simply add your run option to it, develop the mesh between QB and RB, and then work on the QB footwork to make sure he releases the ball when he takes his first step off the mesh. Considering most coaches already have a mesh period, you only need two, five minute periods per practice. And on top of that, you don’t have to make cues to keep your linemen from going downfield because the initial draw step goes backward. By the time they are up the field, the ball has already left the QB’s hands.
This is in essence the magic of the play. It doesn’t take a lot to install, provides a new dimension to your offense, and the timing is already built in because of the draw action.
Here is the visual:
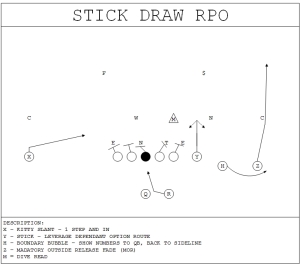
For those who don’t know, the Stick concept on its own is a quick-game concept. Its objective is to create a three-way stretch, or a “triangle”, in the defense so it’s impossible to cover all three routes. The finishing routes of the Y, H, and Z should create the three points of a triangle so that the defense is stretched horizontally and vertically. All three routes can be thrown of a quick hitch step or a three-step drop-back, so the defense has no choice but to be stretched out and hope someone messes up. Indeed, this is what happens most of the time. Because the MOR Fade by the Z stretches the defense deep, the H stretches the defense horizontally, and the Y creates the stretch inside, there is so much space to throw the ball. There are different forms of the stick concept, but for education purposes, the one above this paragraph is common around all circles.
The Y runs the stick. He reads the leverage of the man on him or the Mike to determine which way he is going to turn at the top of his route. If the defender is playing outside leverage, the Y will turn in and vice versa. The Z runs a Mandatory Outside Release Fade (MOR) to run off the CB and take his eyes off the play. This is very important, because if the WR runs inside of the CB and the QB decides to throw the bubble underneath him, the play-side CB will be on the bubble and he’ll make the play immediately via large hit on H. The X runs a 1-step slant backside to provide a check down option against a free-access corner, which is when a cornerback gives WR access to run whatever route he wants to run up to a 5 yard depth. CBs assignments in Cover 3 and Cover 4 are free-access because the WR will not be impeded in his progress, for the most part.
For review, the first read the QB has to make are the NUMBERS in the zones. Right now, he is reading six in the box which means it’s a five (offensive blockers) on six (defenders) matchup in the box. The run game may be a no-go depending on the action of the M, which we will get to later. The QB is also checking the number of safeties (3rd Level Defenders) on top to give him an idea of which coverage it is. In this case, he is thinking either Cover 2, Tampa 2, 2 Man-Under, Cover 4, and will look out for Cover 3 Buzz, because all of those coverages require a two-high set.
Next, he looks to LEVERAGE. He sees that the Corners are playing five yards off so it could be Cover 2, Tampa 2, or 2 Man-Under. He notices that the N is apexed in between the Y and H which is a strong indicator for Cover 2 and it’s variants because the hook defender (N) has to split to the difference between the Y and the H if he wants to get to his landmark, or the zone the defender has to get to. In addition, the W has decided to stay over the left shoulder of the C instead of moving over to the Y. Now he has to decide whether it’s Tampa 2 or Cover 2.
The only indicator that it would be a Tampa 2 is if the M is eight yards off the ball because the M has to hurry to drop into a deep third to protect the seam. Since he is at the same depth as the other linebackers, the QB is safe to assume that he is looking at Cover 2. Hopefully, the QB processed that in less than eight seconds.
Now the QB has to start the play. Set-Hut. The first post-snap read he has to make is the DIVE READ. In this case, the Mike is going to act in one of two ways: one, he is going to dive in on the draw or two, he will drop into his landmark to defend the stick. If he dives, the QB should throw the stick and if he drops, he should give it off to the RB for a five-on-five scenario. Once the situation becomes a five-on-five on five in any scenario, you run the ball. Period.
If the Nickel/Sam decides to come in and help on the Stick, the offense will activate the PITCH READ. As with the Bolt concept, the QB will throw the ball to the bubble with Z running off the corner.
Now let’s say the defense rolls their strong safety to help out in the passing game like such:

See the Strong Safety ($) 7 yards off the line of scrimmage in between the Y and the H? That presents a big problem for the every read we made because he adds numbers in the box, leverage against the concept, and then his presence accounts for both the stick and the bubble. Since he is there, he can double team the stick because he is after all, a curl/hook defender. Coaching circles call him the Bronco defender which is technically more correct, but whatever floats your boat. In addition, he frees up the N to cover the bubble and the CB can now cover the fade alone in his advantageous deep third responsibility. So what to do now?
Now the QB has to move to his STRETCH READ. He can’t get to his third read on time, so he will signal to the X receiver that he is getting the ball right away whether it’d be a sight adjustment, a code word, or a hand signal. He is going to throw it to the X on the Kitty Slant as soon as the other two reads have closed. Since the defense is playing in Cover 3 and the Will is shifted over above the guard, he can’t get to the slant by the time it’s thrown. All X has to do is catch the ball and make a guy miss. There are a lot of teams that will have the X run a hitch or a variant of that route to combat Cover 3 specifically. Like I said before, whatever the team is most comfortable and prepared for will work in this situation. The only stipulation: it has to be a good route against free-access (Cover 3, Cover 4, Soft Man, etc.), where the corners give room for receivers to run short to intermediate routes.
If for some reason the corner doesn’t give free-access and he is pressed up against the X like a Seahawk corner would be, then he is then what we call “on an island” and the QB should be salivating to throw over the top of him. Unless the back-side corner has a ton of talent or the WR is horridly bad at getting open, this is a big play waiting to happen.
Here is the Stick Draw concept run by a QB named Brock Osweiler
Here it is in its most common form
My Writing Schedule as of Now (Chronological Order):
- Introduction to RPOs: Part 3 (Search, Snag, and the Power-Read)
- May 29th
- Defending against the RPO: The Scrape-Exchange, Bracket Coverage, and Cut Corners
- June 3-5
- The Politics Of Coaching
- June 6-9
- Player Analysis: Brock Osweiler
- June 10-12